parallel guest network access, printing and caching
So, let’s move this macOS as server topic one step further. After we reinstalled from scratch the last time, today we will set up the network, activate the firewall, install and share the printers, add a third party application for Airprint-compatibility, implement the Apple content caching and optimize some settings for server use.
For the network part, I have to admit that I am using two networks at home. An internal one called HOME and a GUEST network. HOME is available on wired and wireless, GUEST is available as wireless network only. There are multiple reasons for this: One of the reasons is that I can prioritize internet bandwidth for the internal network to be higher than guest network, another reason is that I do not want guests to be able to access internal systems like the smart home web, network device web interfaces or file shares. Going further, my servers are usually only accessible from the internal network. If you do not have a separate guest network, you can skip the guest network part, of course.
Network connection setup
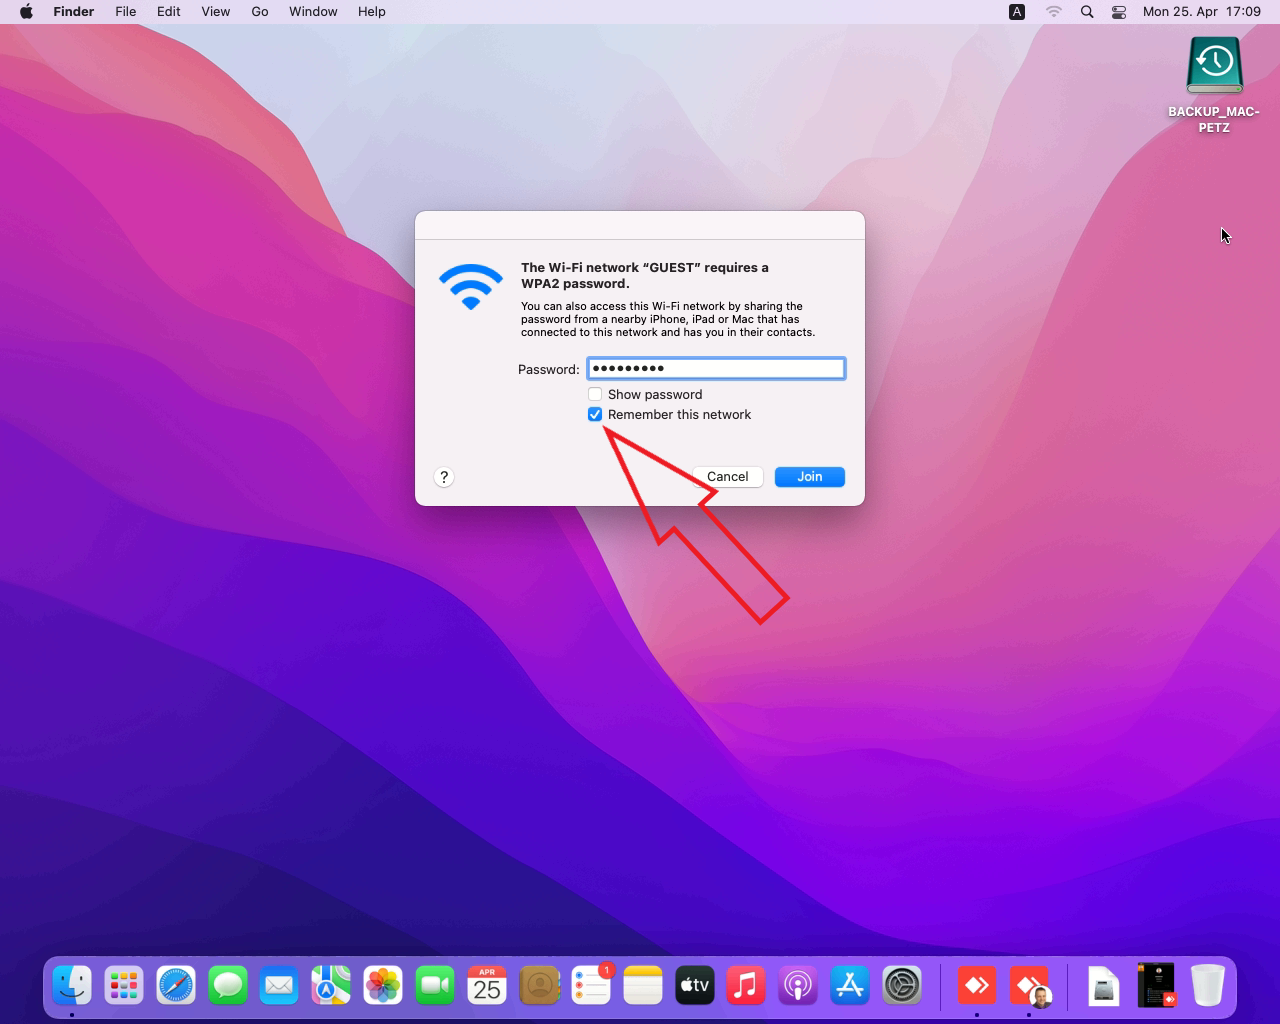
Let’s start with the setup of the 2nd network connection. As I already used wired ethernet to reinstall macOS, we will now connect the guest network using WiFi. Click on the greyed-out WiFi symbol on the top of the screen and select the guest network.
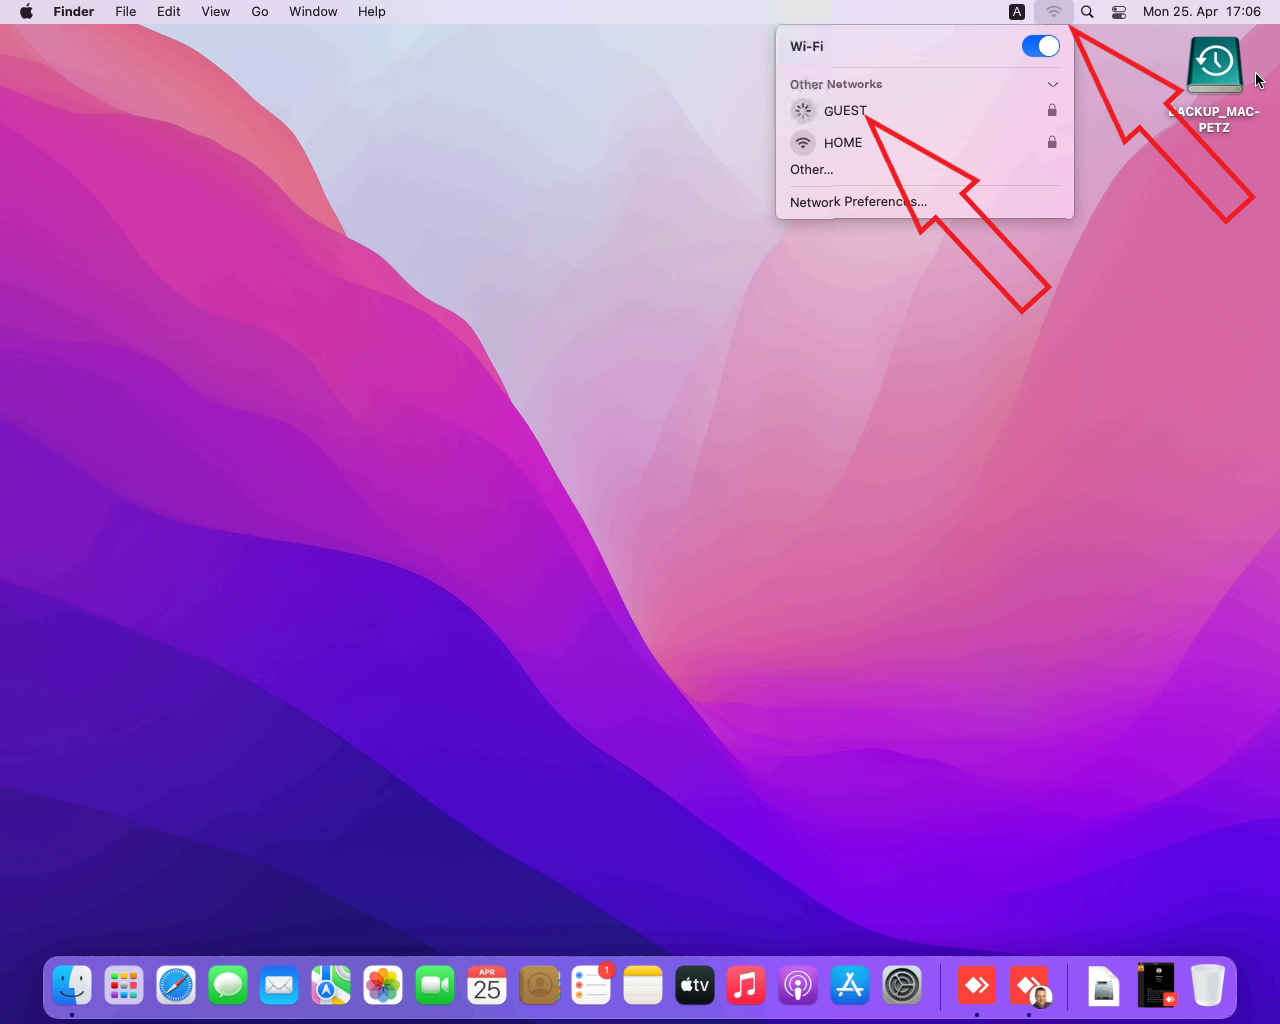
Your WiFi should be password protected – even the guest one – so enter the password now and ensure that the checkbox ‚remember this network‘ is ticked and click on ‚join‘. Just to note here: in the way my macOS is set up – using the same account like my iOS mobile devices, that GUEST network is also added on all of my mobile devices. If that is the same for you, deleting the GUEST network from the mobile devices will disconnect the macOS from that network as well.
Edit: This really bugged me a lot. As my MacOS installation is tied to my AppleID, preferred wireless networks sync across devices. So, on a restart the mac mini is most often back to my private internal network called HOME. If I change that again to GUEST, the guest wireless moves up in priority of network, it gets synced to my other devices and on next wireless re-join they are moving over to the guest network as well. I found no way to stop that from happening, so I decided to buy an Apple USB Ethernet Adapter, which connects via USB 2.0 on the mac mini to my guest network using ethernet cable. I switched off WiFi on the mac mini afterwards and removed the GUEST SSID from the known wireless networks. So, if you would like to go the USB ethernet adapter route as well, apply the TCP/IP configuration steps to your second Ethernet connection instead of WiFi.
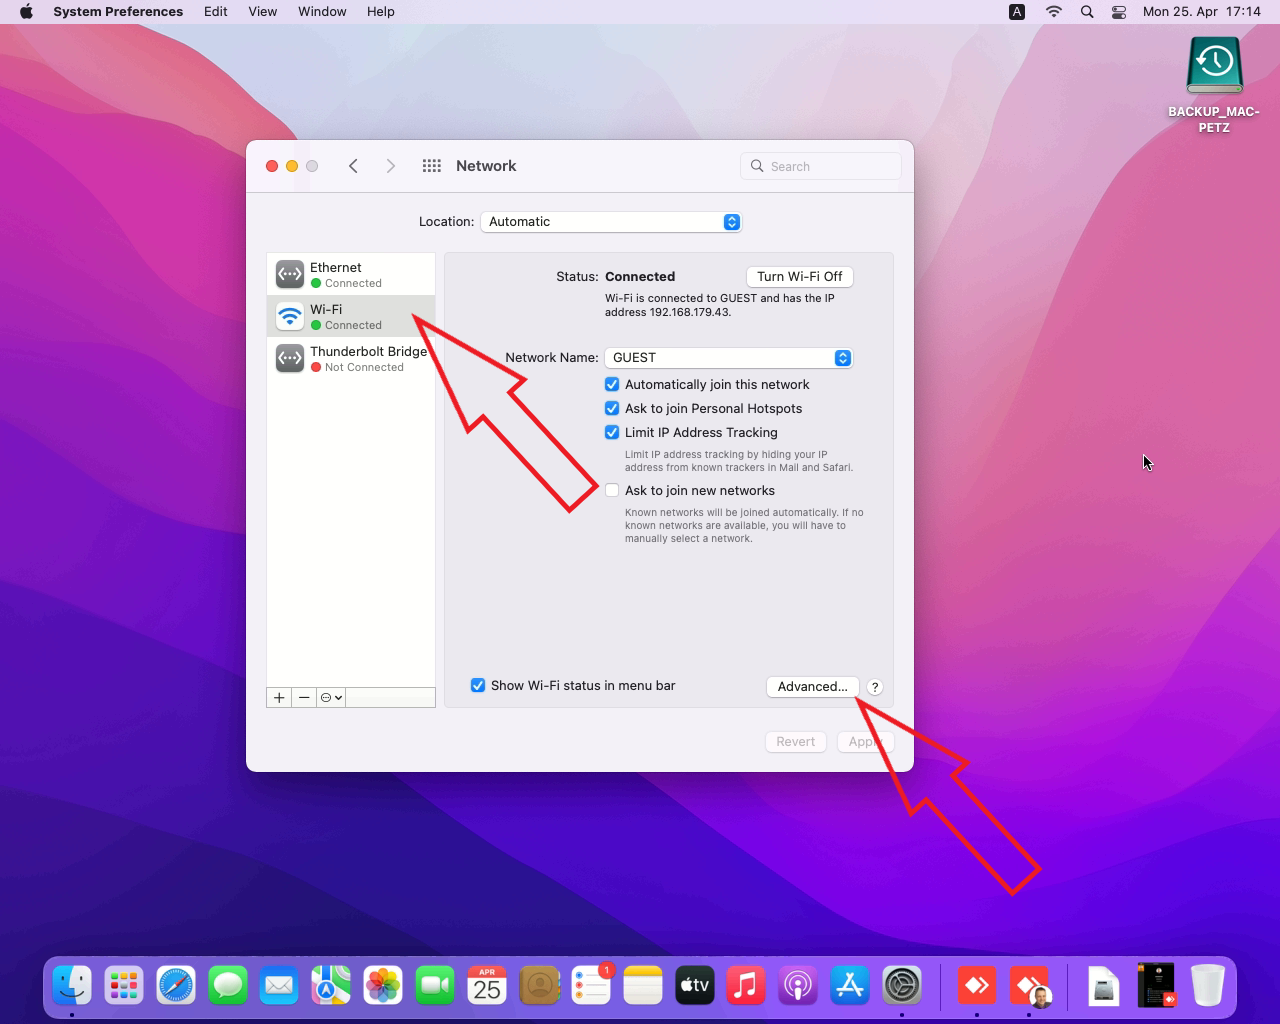
The Wi-Fi symbol should now be shown at least partly in black to indicate the receiving signal strength. Click the symbol once more and select ‚Network Preferences…‘. What we did just now is the classical nightmare of an IT administrator – we are connected to two different networks at the same time, both assigning DNS servers for name resolution and a way into the internet (DNS = domain name service). And we do not now for sure, which DNS server and which connection will be used. To ensure that the Mac will access internet via internal network and does not use the guest network we will manipulate those settings now. In the network panel make sure that Wi-Fi is selected on the left side, then click on the ‚Advanced…‘ button on the lower right.
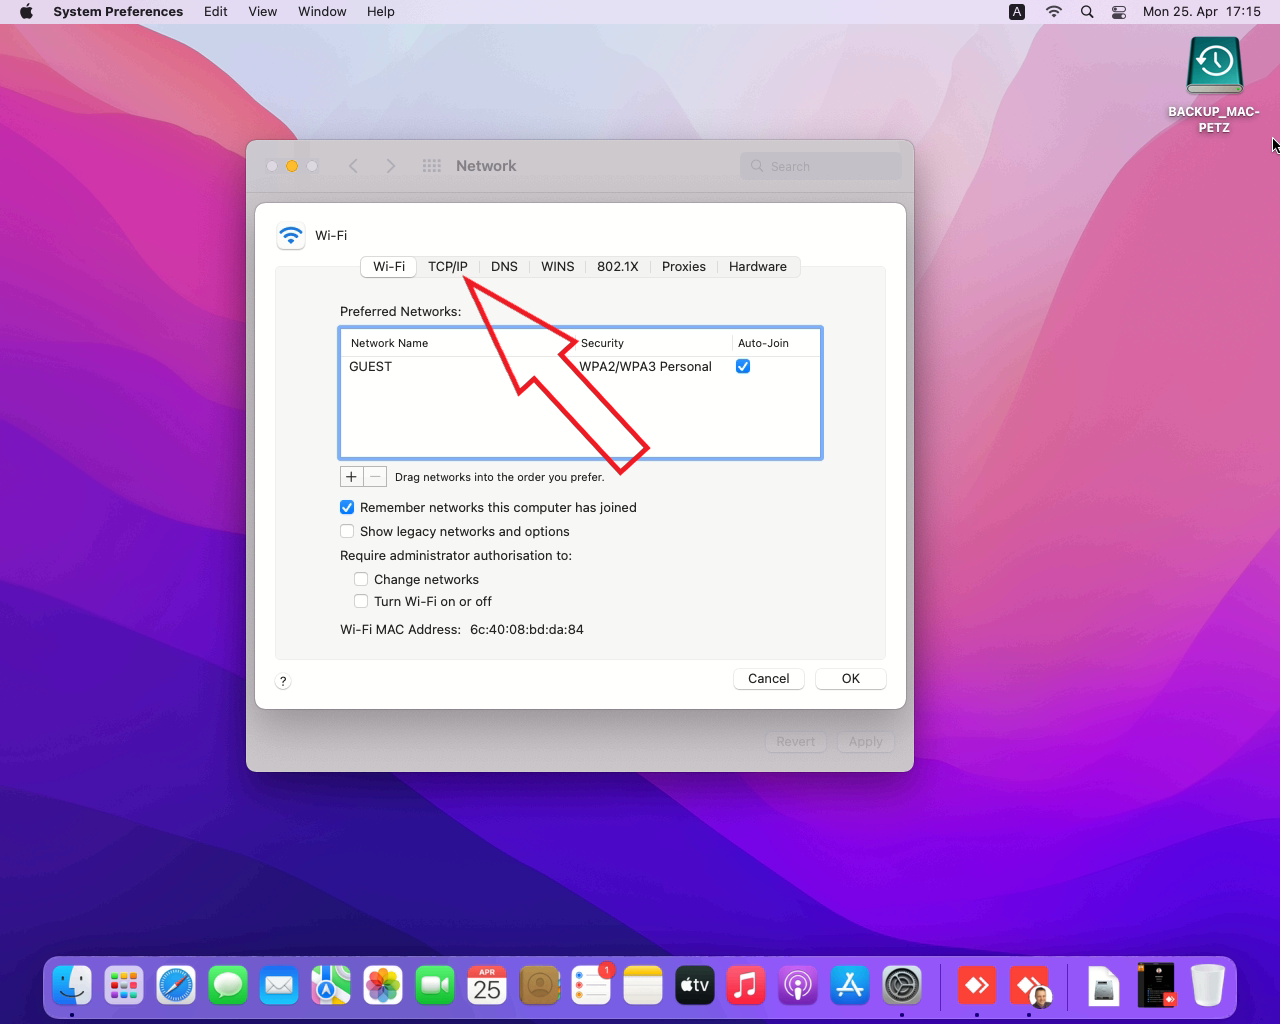
To go further, you require some knowledge about your network and especially the network address range and DHCP range in use (DHCP = dynamic host configuration protocol). For the fritz!box I am using here, the guest network is by default 192.168.179.0 with a subnet mask of 255.255.255.0. Explained the fast way, this 255.255.255.0 subnet mask defines that 192.168.179 is the network part of the IP address and the last value after the third period is the host part. The host part being 0 is the address of the network itself; if the host part equals 255 that one is the broadcast address to all network hosts. Due to those two special addresses the usable IP addresses in that network range are 192.168.179.1 to 192.168.179.254. An IP address must only be assigned to a single device at the same time or both devices might loose network access. The fritz!box uses 192.168.179.1 for itself and is handing out all other IP addresses in that range beginning with .2 counting up to the guest devices. The router itself is the gateway – so the device where traffic has to go to for accessing all other networks – in our case we are primarily interested in reaching the internet. The router also is the DNS server for the network, answering all name requests and translating them into technically used IP addresses (it does this by answering local name requests on the same network itself and for everything else asking the internet providers assigned DNS servers). Gateway and DNS server information are handed out to the clients together with the assigned IP address – as long as they are configured as DHCP clients. If clients are set to be manually configured, all these information have to entered manually. Now select the TCP/IP tab.
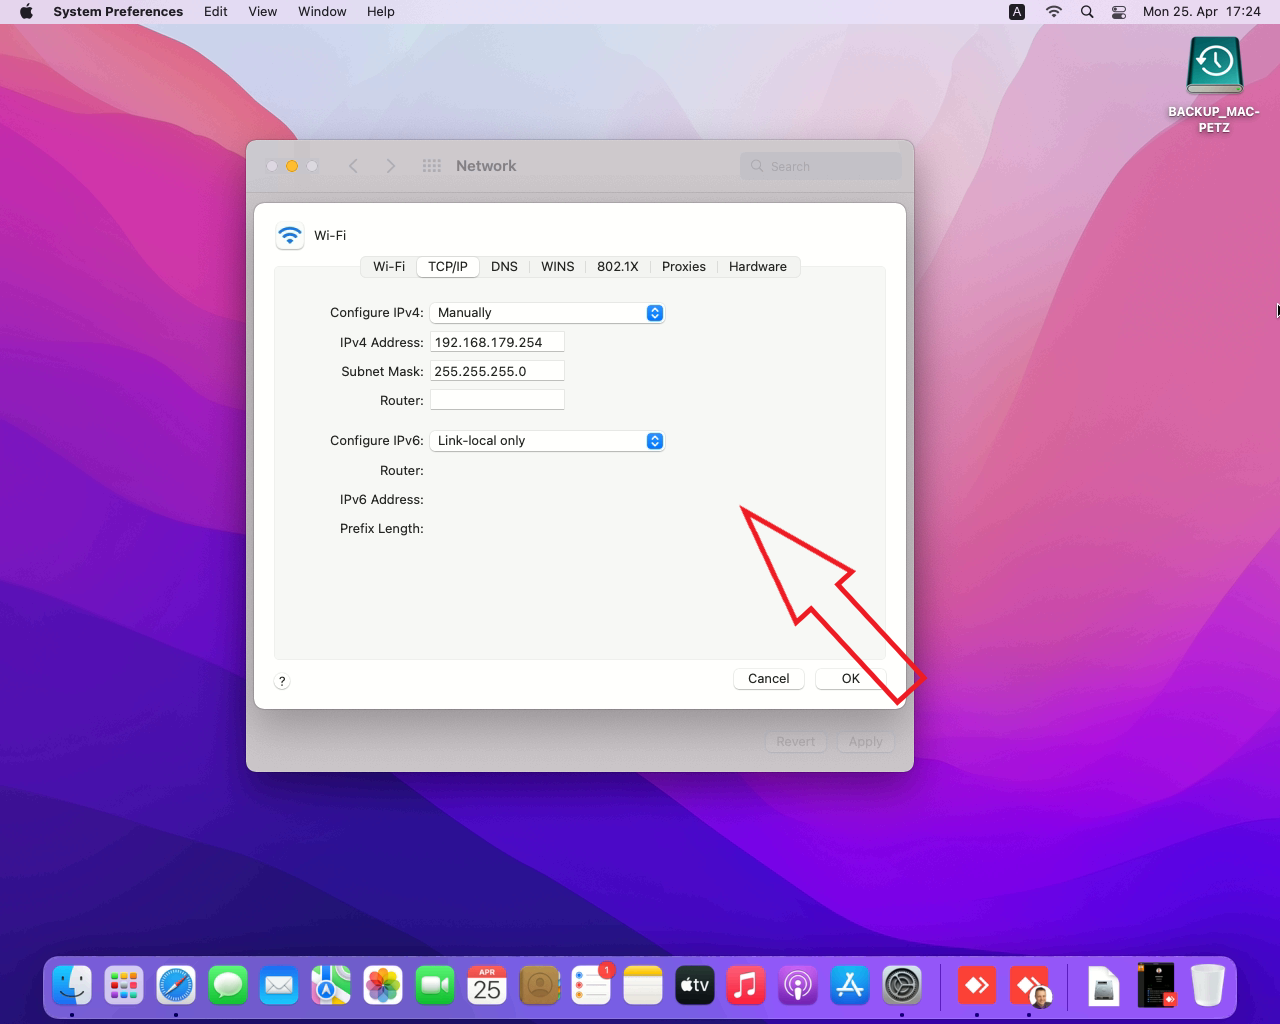
By default, the network connection is set up to use DHCP assignments. To stop the Mac from using the guest network for name resolution and internet access, we need to remove gateway (called router on macOS) and DNS server address. But to be able to do so (because they are assigned by DHCP), we have to switch Configure IPv4 from ‚using DHCP‘ to ‚manually‘ first. When this has been done, I use the following settings (as defined on my guest network:
- IPv4 address: 192.168.179.254 (highest one in the network and unlikely to be ever handed out)
- if possible this one should be reserved on the DHCP scope or excluded
- Subnet mask: 255.255.255.0 (keep, just like before)
- Router: remove the entry completely
- so the way out to the internet on that interface is unknown
Configured this way, only access from the server into the guest network is allowed. And as no gateway or DNS server is configured, there is no name to IP address resolution working on the Wi-Fi side and there is also no known way out into the internet there. With IPv4 configured properly,we have to limit IPv6 now, so traffic does not go out to the internet on the guest network via IPv6 (if available). IPv6 works quite different in the background, especially how IPv6 address and router assignment is done. I will skip the basic installation here just because it is quite complicated and dealing with that behavious is really simple: just switch IPv6 from ‚automatically‘ to ‚link-local only‘.
Apply the changes with OK, which will also close the Advanced window. Click Apply in the Network window and all settings will become active. As we removed internet access from the Wi-Fi now, its symbol will show an exclamation mark very soon. If you are like me, you may not want to see that see that erroneous symbol anymore, so disable the checkbox ‚Show Wi-Fi status in menu bar‘.
Please note that we did not assign a static IP address for the wired connection yet. If your network is stable and the router does its job as name server properly (mapping name to currently assigned IP address), there should be usually no need to assign a static ip. For my own convenience and to be able to still use IP address to connect or check if system is available, I configured a static DHCP reservation on the router for my device, so the Mac always gets the same IP address when asking for one. But You will need to note down the DNS server IP address for the wired connection (!) for later and you should know by know how to get there. Most likely, your DNS server IP address will be the same device like the router. (If it is not, I don‘t expect you to read this part of the guide at all)
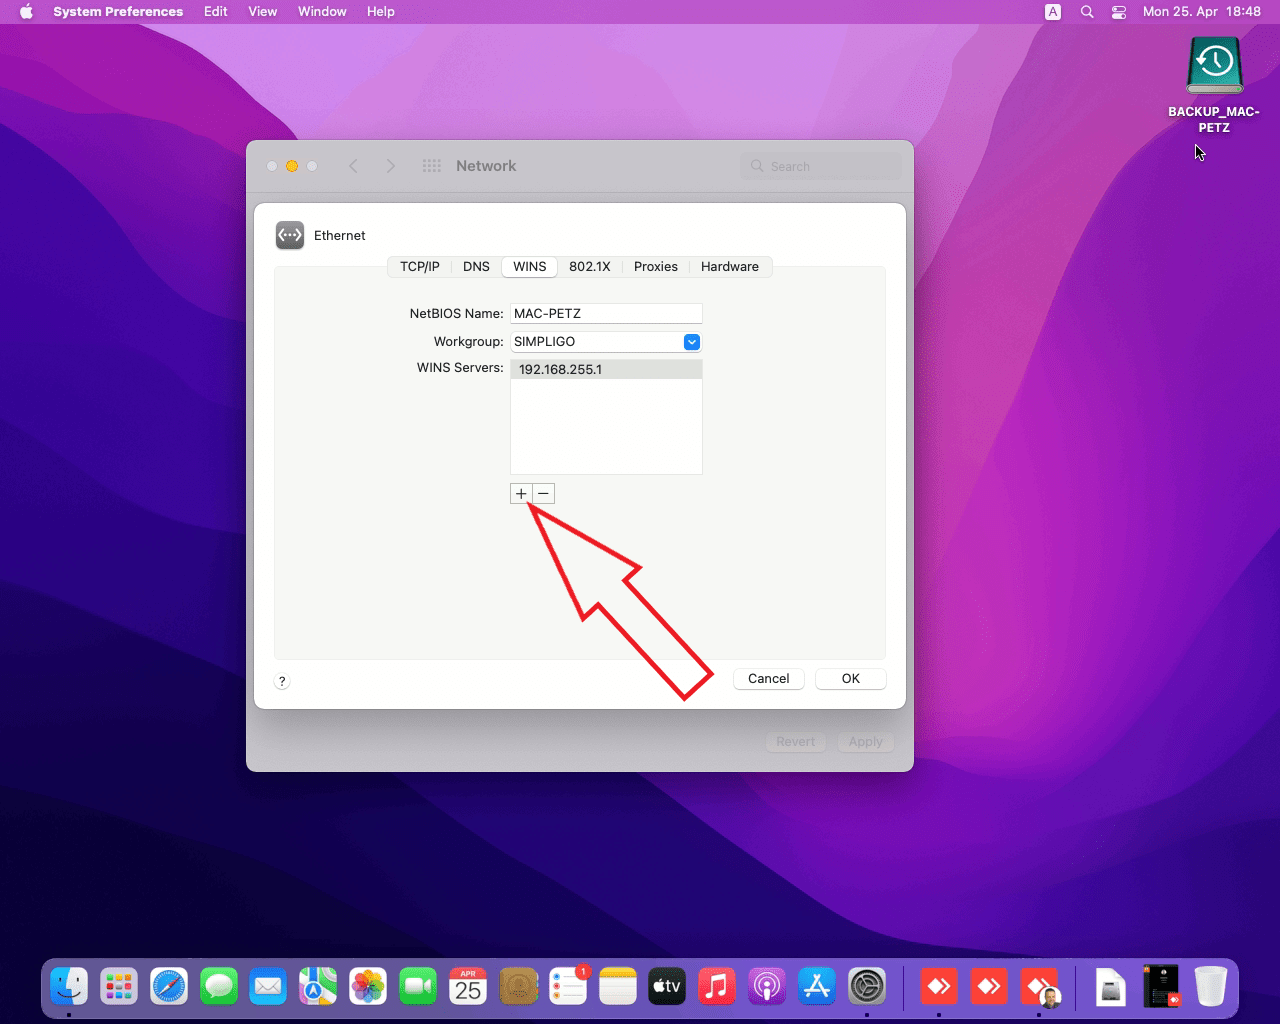
Let us configure the device name and workgroup next. The first fact you need to know, is that the Mac has two name settings, which are by default not synchronized like on Windows. Select Your main network connection and go back to the ‚Advanced‘ tab and select WINS on top. NetBIOS is a deprecated Windows protocol for local area network name resolution back from Windows NT somewhere between 1990 and 2000, but still available and running on all current Windows releases to ensure backward compatibility. My urgent recommendation is to keep both names the same. NetBIOS names are limited to 15 characters and I would only use a dash in addition to letters and digits to stay away from any trouble. You also want to make sure that the name starts with a letter and not a digit or dash because that is also known to create issues.
Mine is just MAC-PETZ and I always use SIMPLIGO as workgroup name. To have the macOS accept your changes for device name and workgroup in the WINS tab, you are required to enter a WINS server address here. As I do not have a separate WINS server running, I just use the DNS address from the internal network noted down before. If you do fulfill that requirement, there will be no warning and no error message – it will just not save what you entered there at all. Confirm your changes with OK and a second time with Apply in the Network window. Then open the Apple menu and restart the device. Just another hint in case you are using a fritz!box as internet router: I could not set the name on the Mac itself as long as I am using a DHCP assigned IP address. macOS always took over the device name as set in the fritz!box. I had to set the name in the fritz!box network configuration interface on the device entry itself. After a reboot, the Mac changed the name according to the setting there. For the SMB file sharing protocol to use the same name as well, we have to open the System Preferences panel, select Sharing and enter the new device name into the Computer Name field and save that. Do not ask me why, originally SMB would have used the formerly set NetBIOS device name… we’ll visit the Sharing area later for the Content Cache – so no need to do this right now.
Enabling the firewall
The firewall will block all unallowed connections to services running on the device using the network connection. It can do a bit more than that, but for the beginning that should be the thing you need to know.
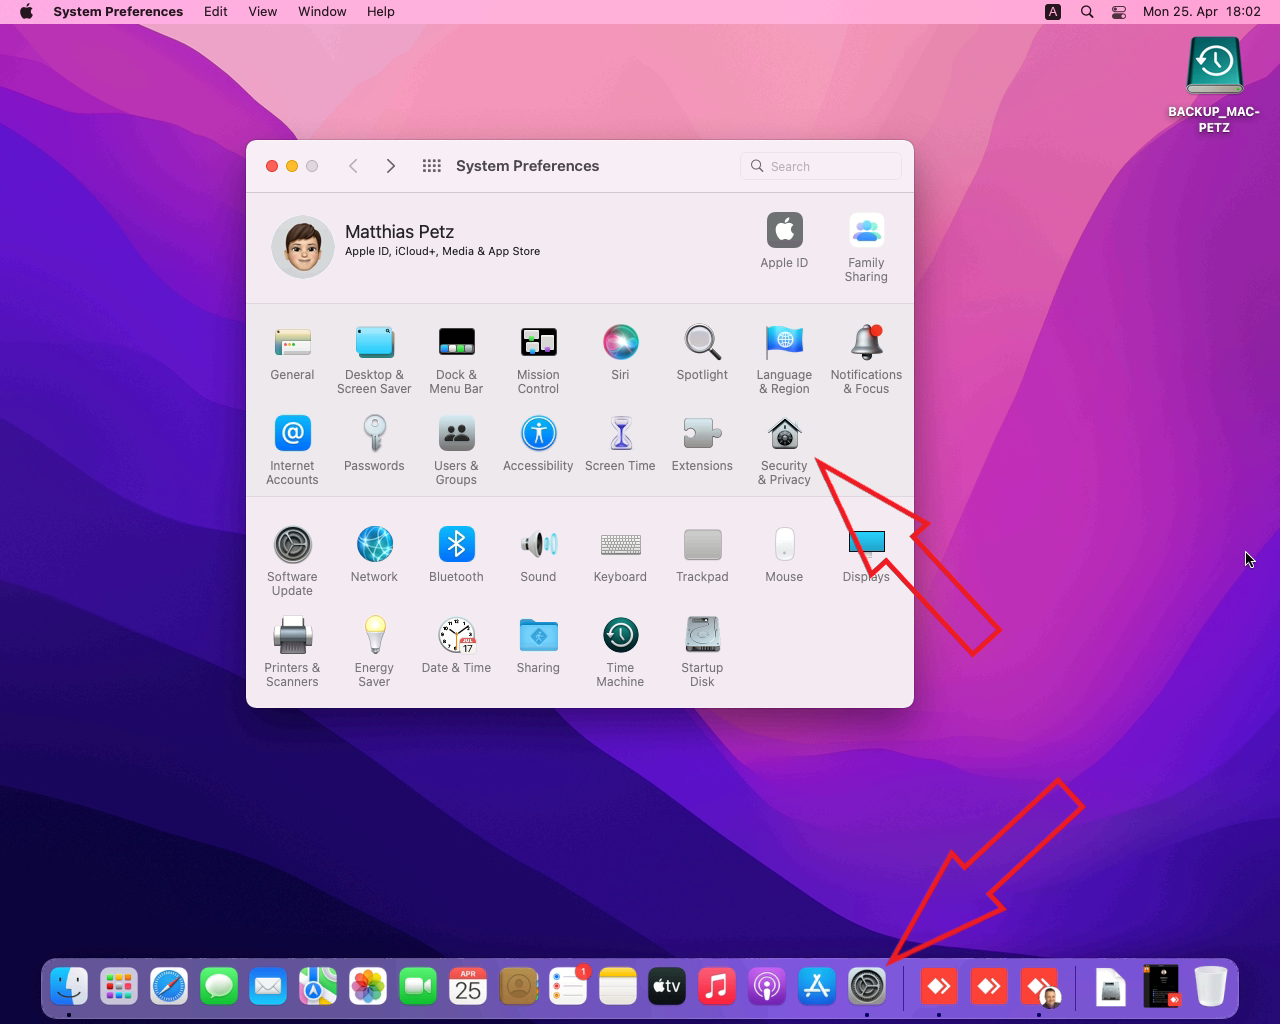
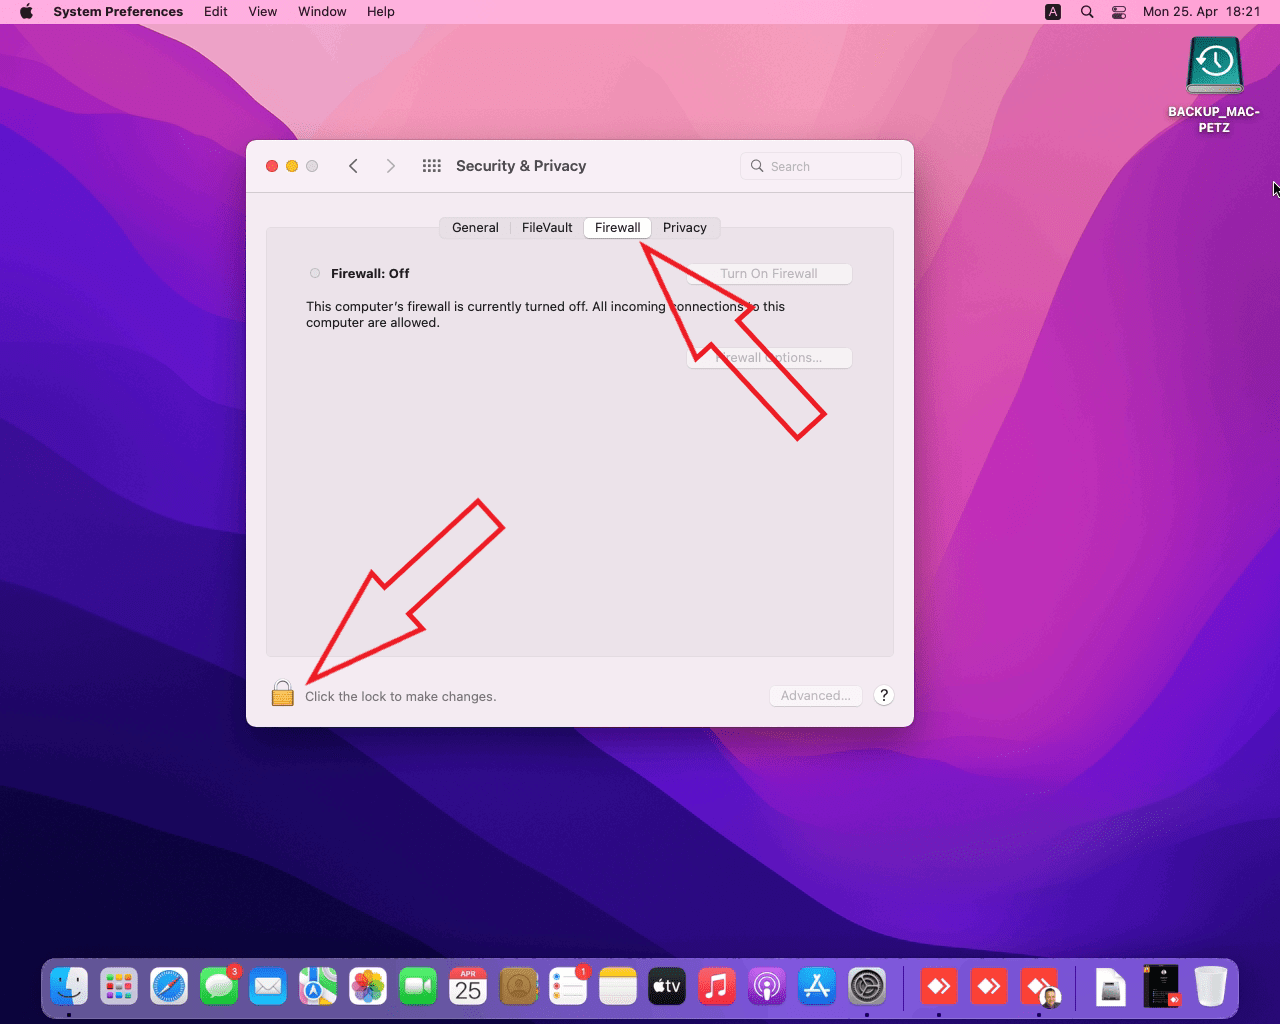
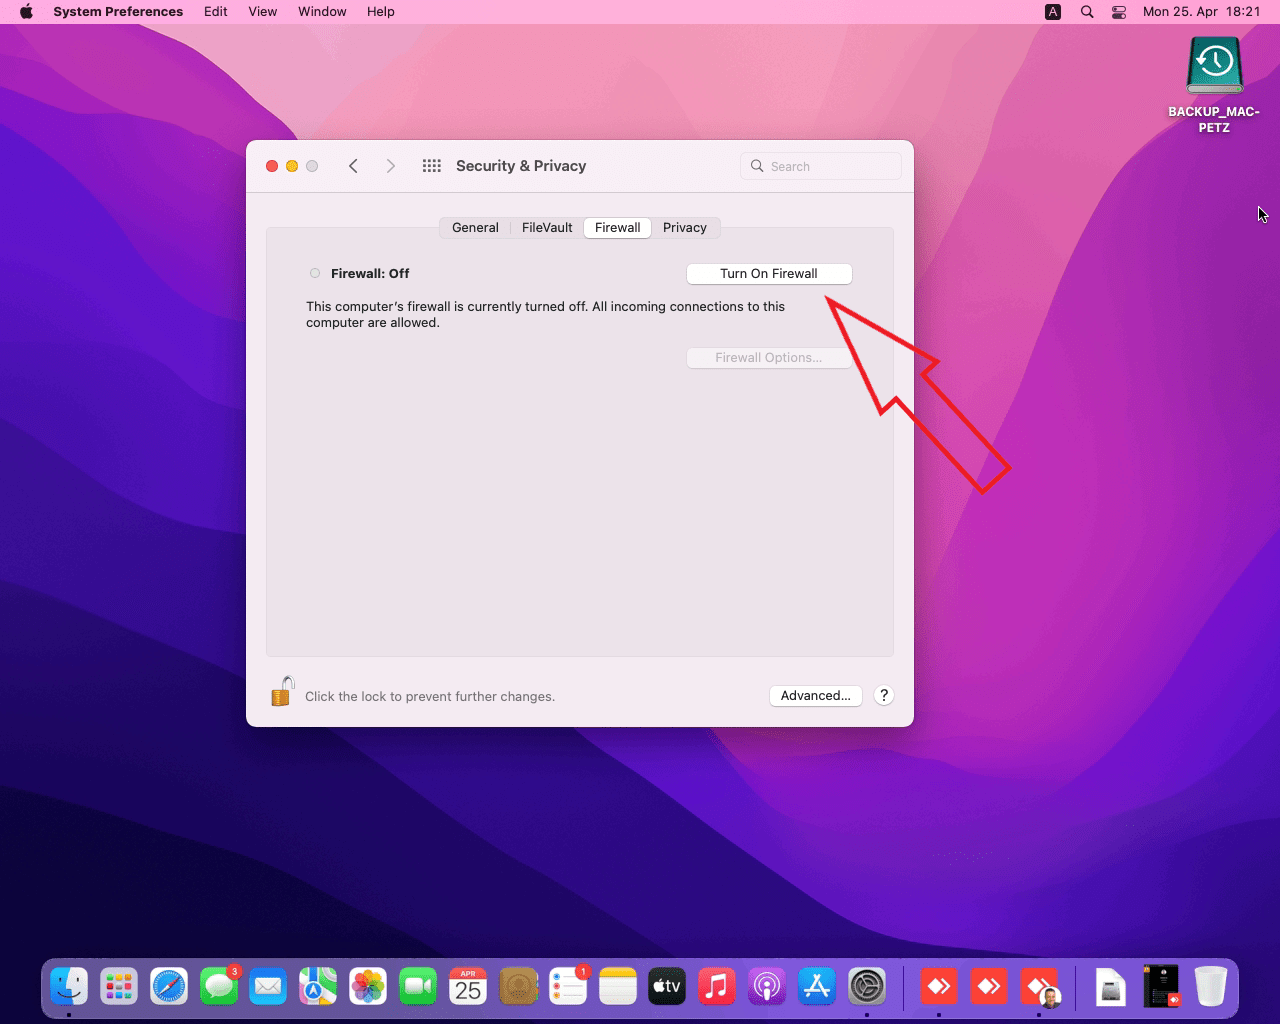
To enable the firewall, open the System Preferences and select Security & Privacy. Afterwards, select Firewall on top and unlock the panel on the lower left. This enables the button ‘Turn On Firewall’ which you may press now – please ensure that you are either directly in front of the device with keyboard, mouse and screen or remotely connected using a software that initiates inside-out-connections like Anydesk or you might kick yourself out, being unable to reconnect remotely. Standard settings for the firewall are fine for now, although I am a bit worried that we cannot do some more specific setup based on services/protocols per network adapter.
Setting up printers
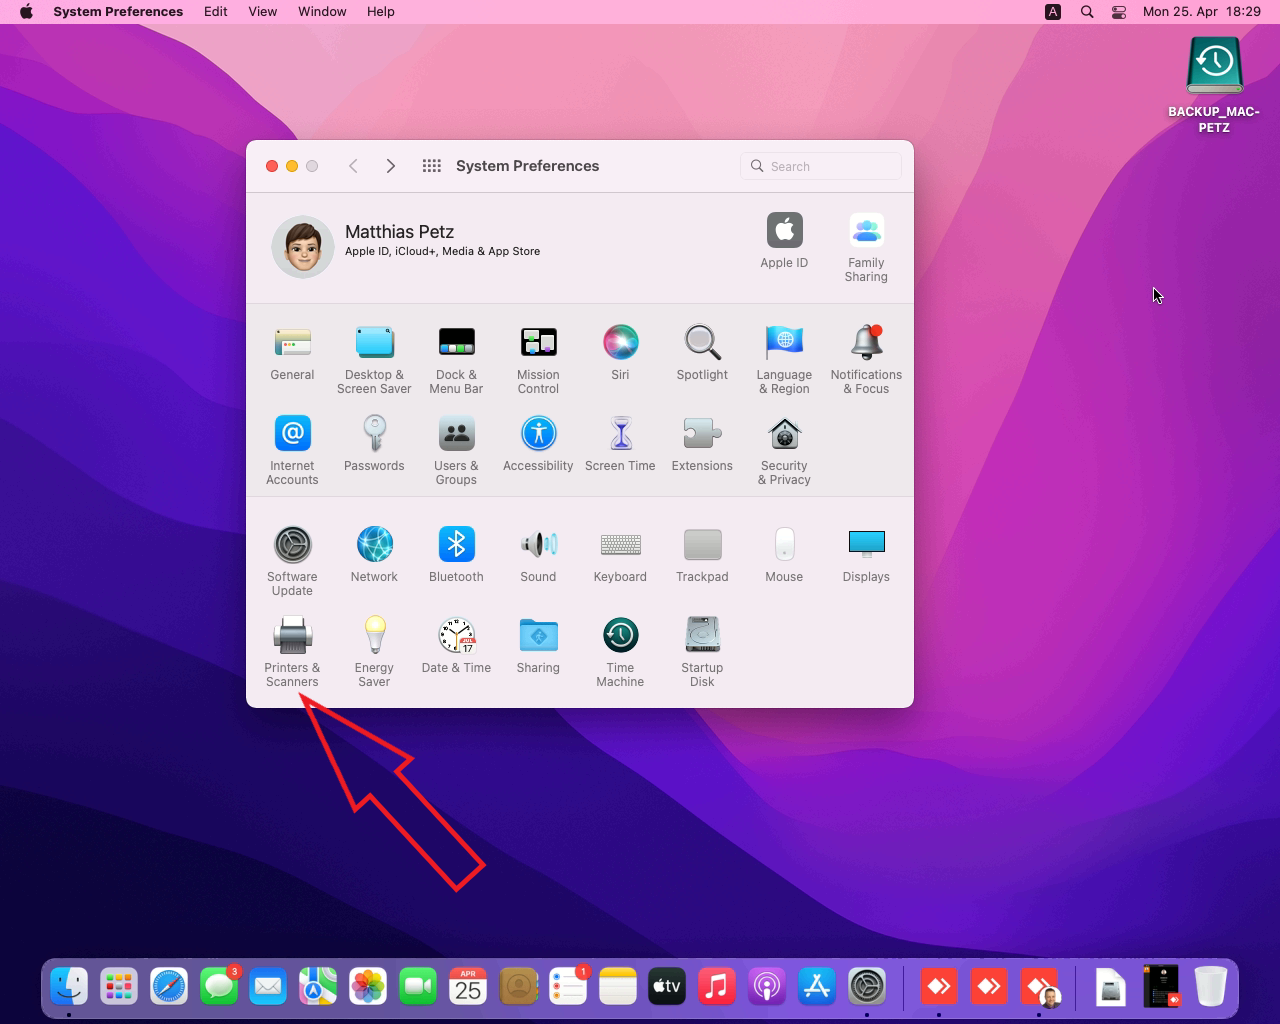
Within System Preferences choose Printers & Scanners.
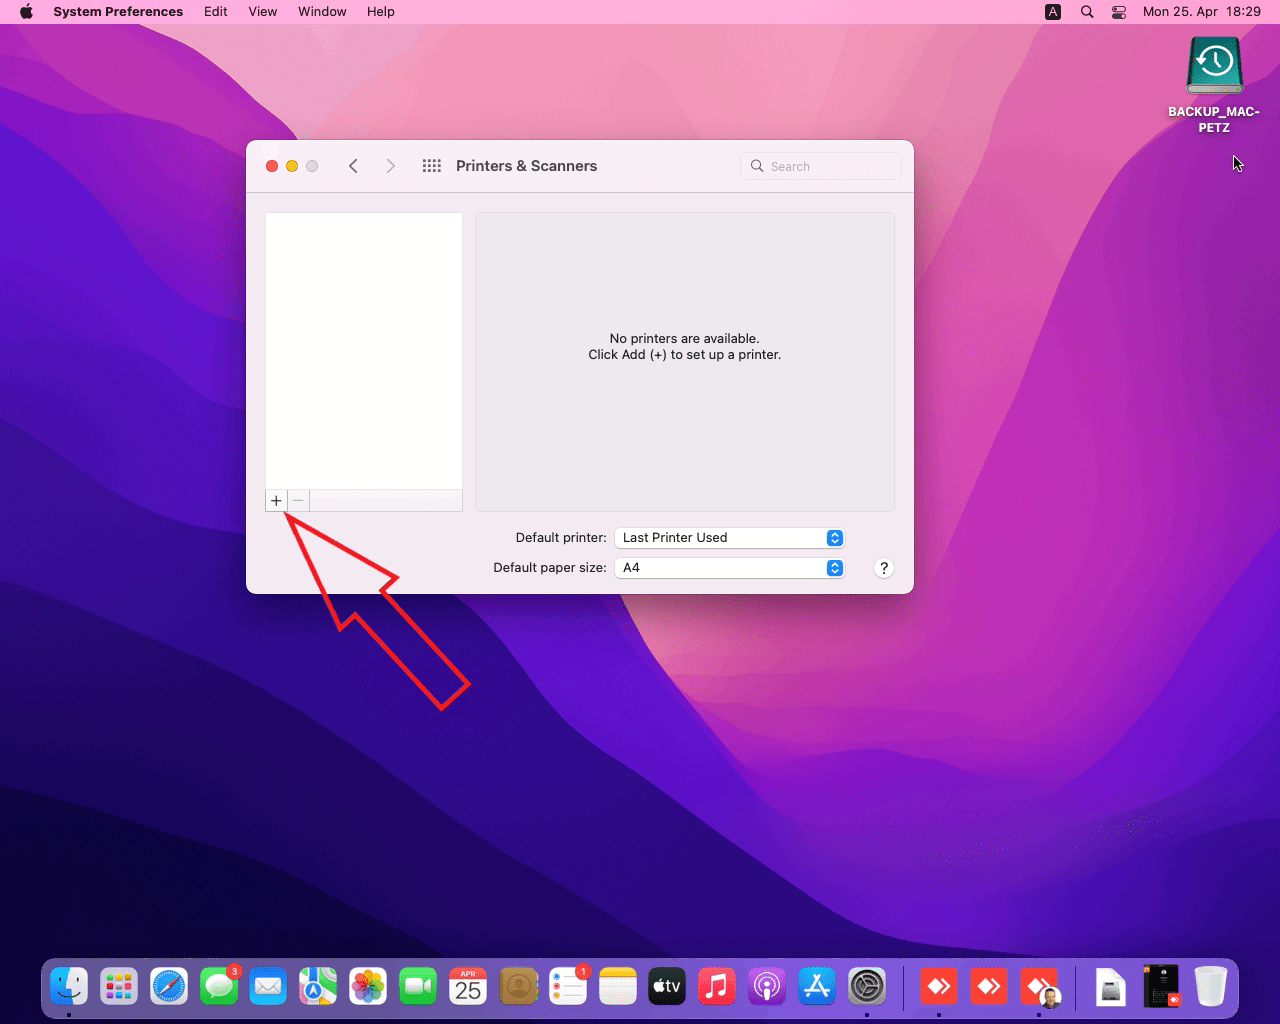
Below the still empty list on the left there is a small plus sign – click it to add a printer. It helps a lot, when the printer is running before you try to add it – especially for network printers. MacOS will only show network printers, if they are also online. For adding network printers, please do not add printers in a way that they depend on another device running (Windows Server or already shared on another Mac), add them by direct network protocol access – so IP.
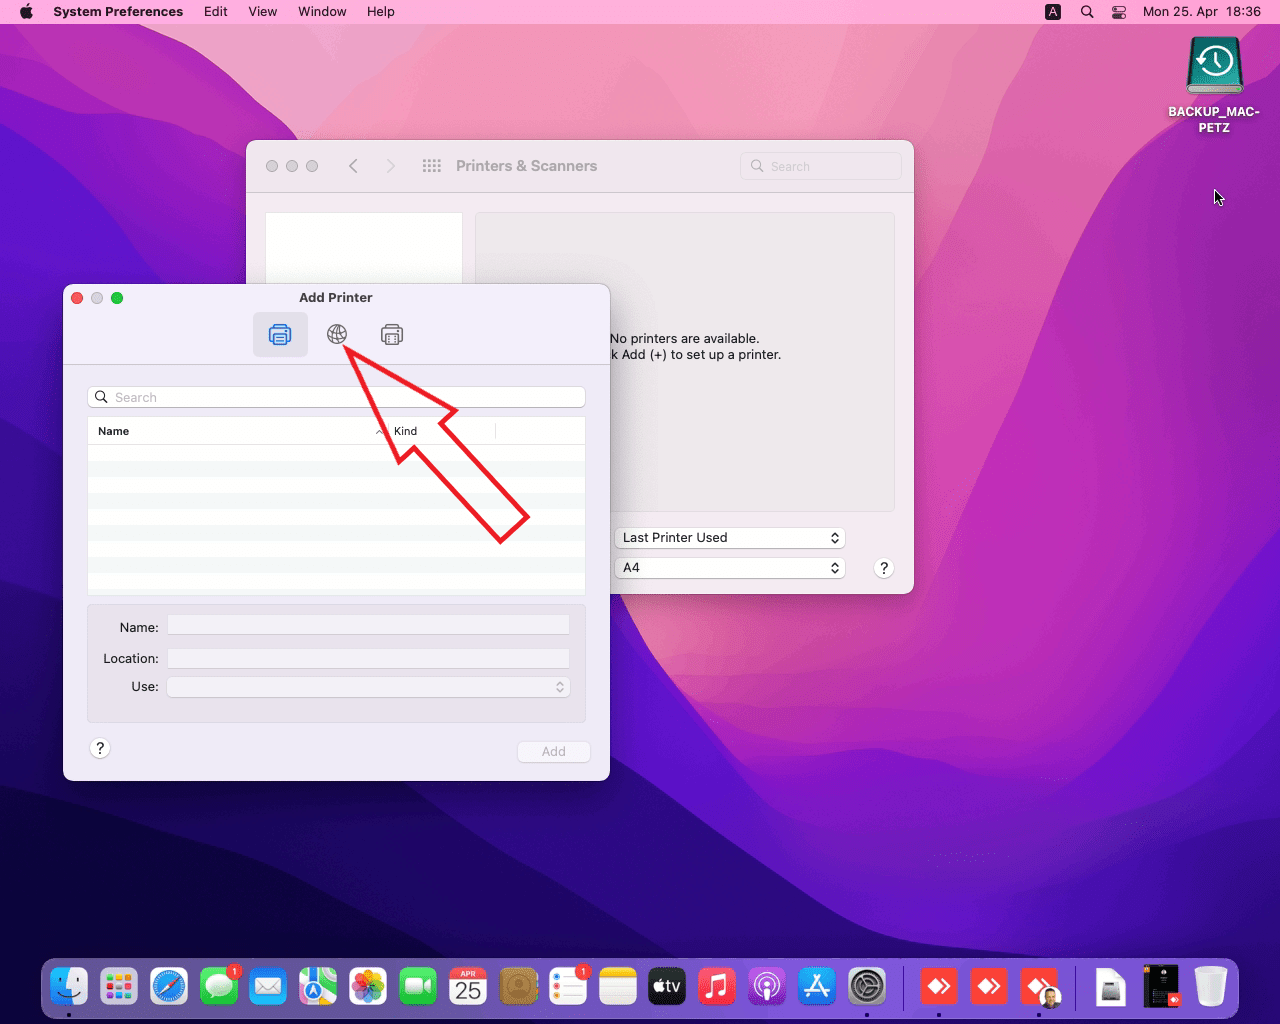
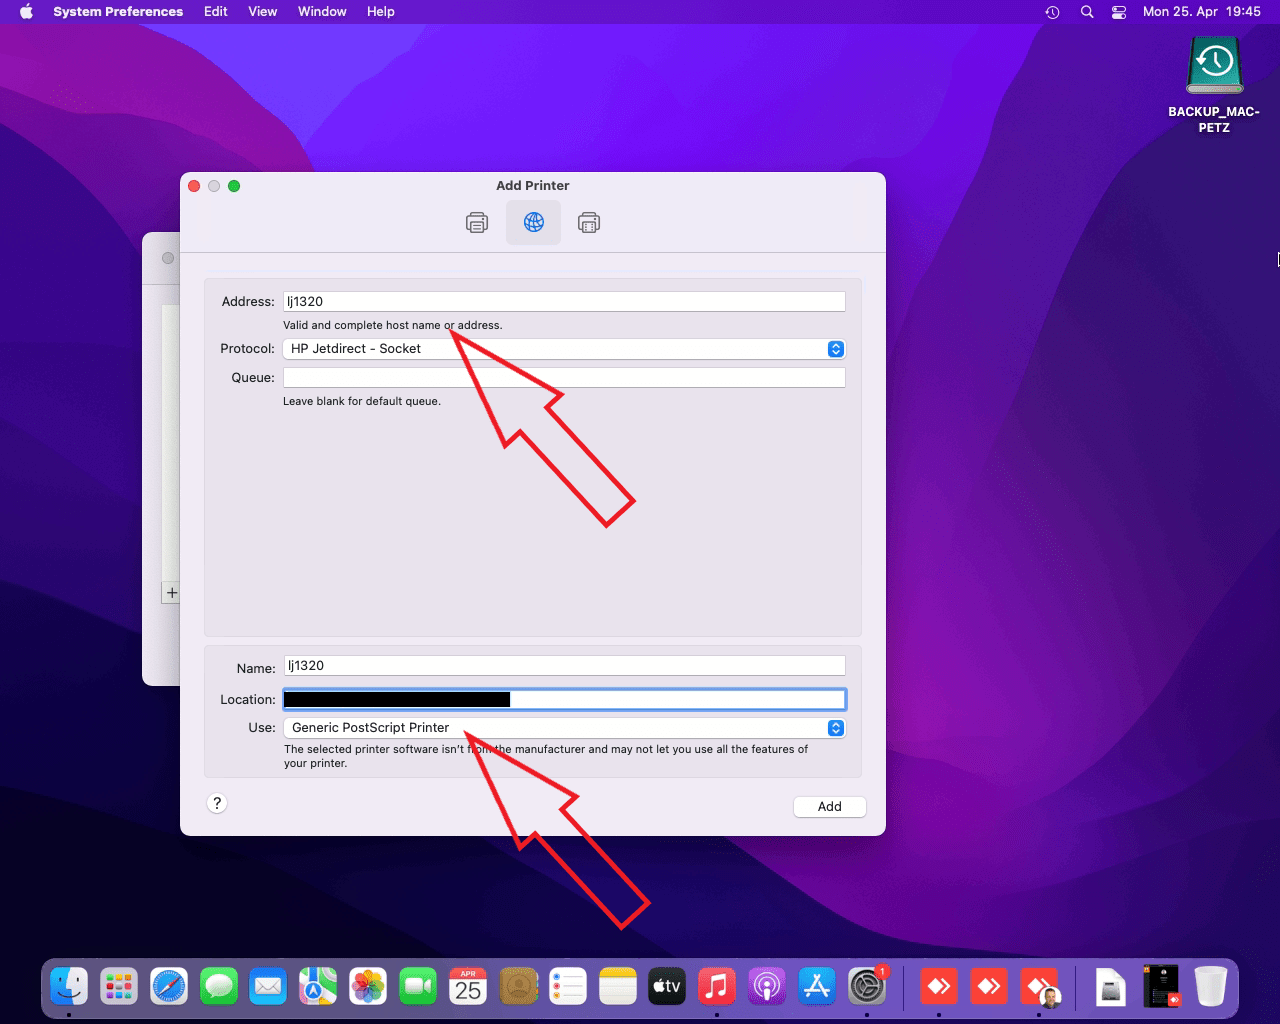
For my HP printers that’s fairly easy – I just need to select the Globe icon on top for IP, switch the protocol to ‚HP Jetdirect – Socket‘ and enter the DNS device name. Once again – please do not use the IP address, that could change on a DHCP network, if the printer has been switched off for a larger period of time and your shared printer will stop working due to that. The DNS device name of the printer is either set on the device itself or on its webinterface. In case there are no macOS drivers available, try using the Generic PostScript or PCL driver. Interestingly, although my old HP printers are both capable of PostScript and that usually produces more pleasant results – that was not case on macOS and I used PCL after some testing for the first setup. Those generic drivers do not support all bells and whistles, but if you only need basic printing they will get the job done. You may try the ‘Select Software’ option as well or load specific files if you have those.
As soon as the printer was added, go to ‚Options & Supplies‘ to check, if the cartridge level is visible and set up the installed options like duplex unit. For my AirPrint-compatible printer, adding that to the Mac and sharing it does not really make sense as I can print directly to it as long as it is running – but maybe the print queue on macOS allows me to print to the queue even when the printer is still offline. Being able to send the print job and turning on the printer later for picking up the printout could at least be worth a try. I would also recommend to enable printer sharing with default permissions – doing this other macOS devices on the network can find and print to these printers as well.
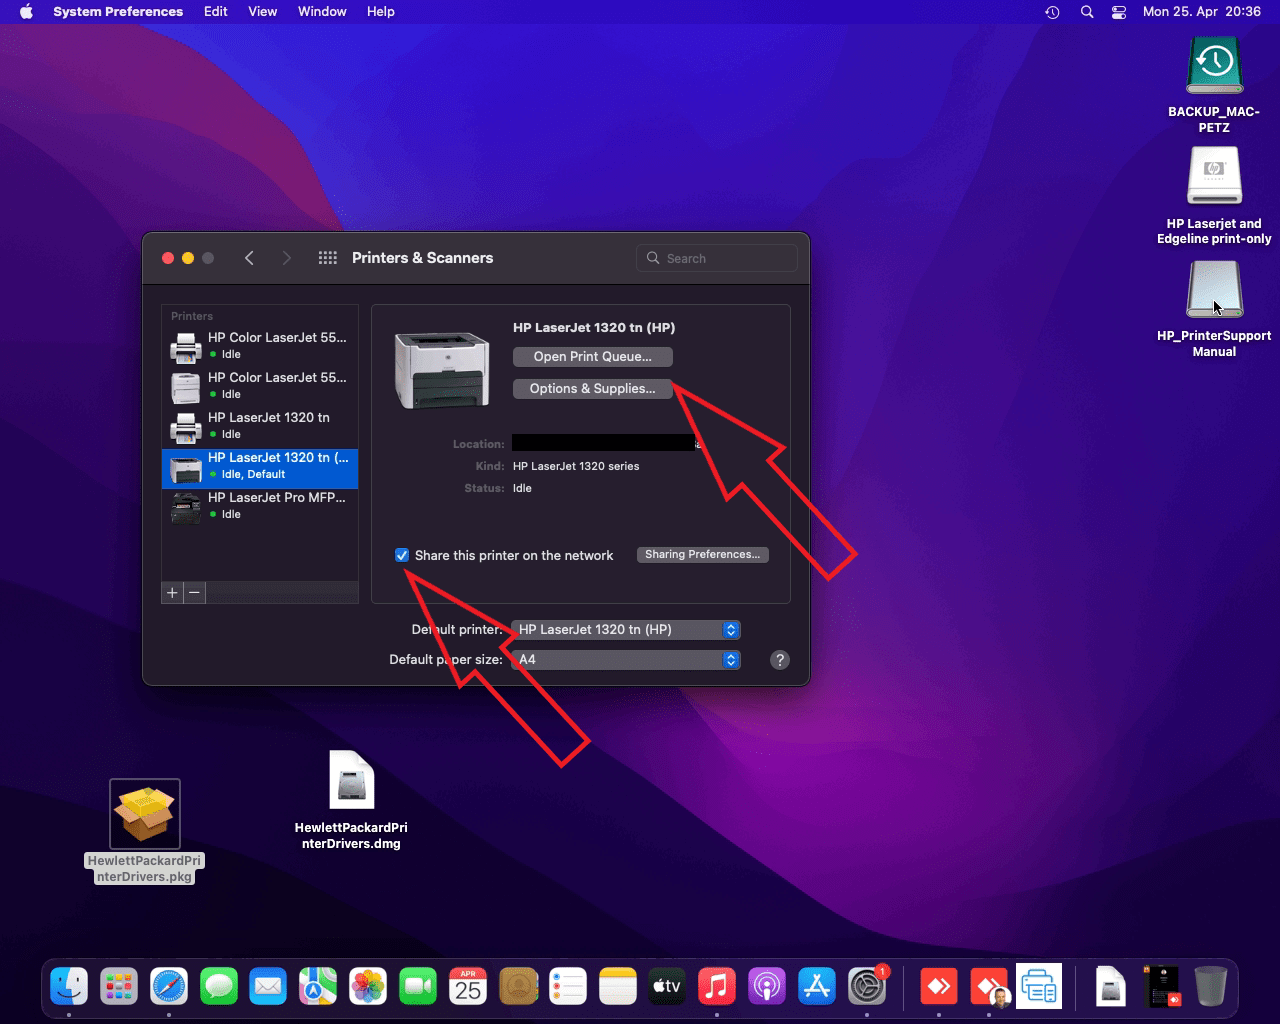
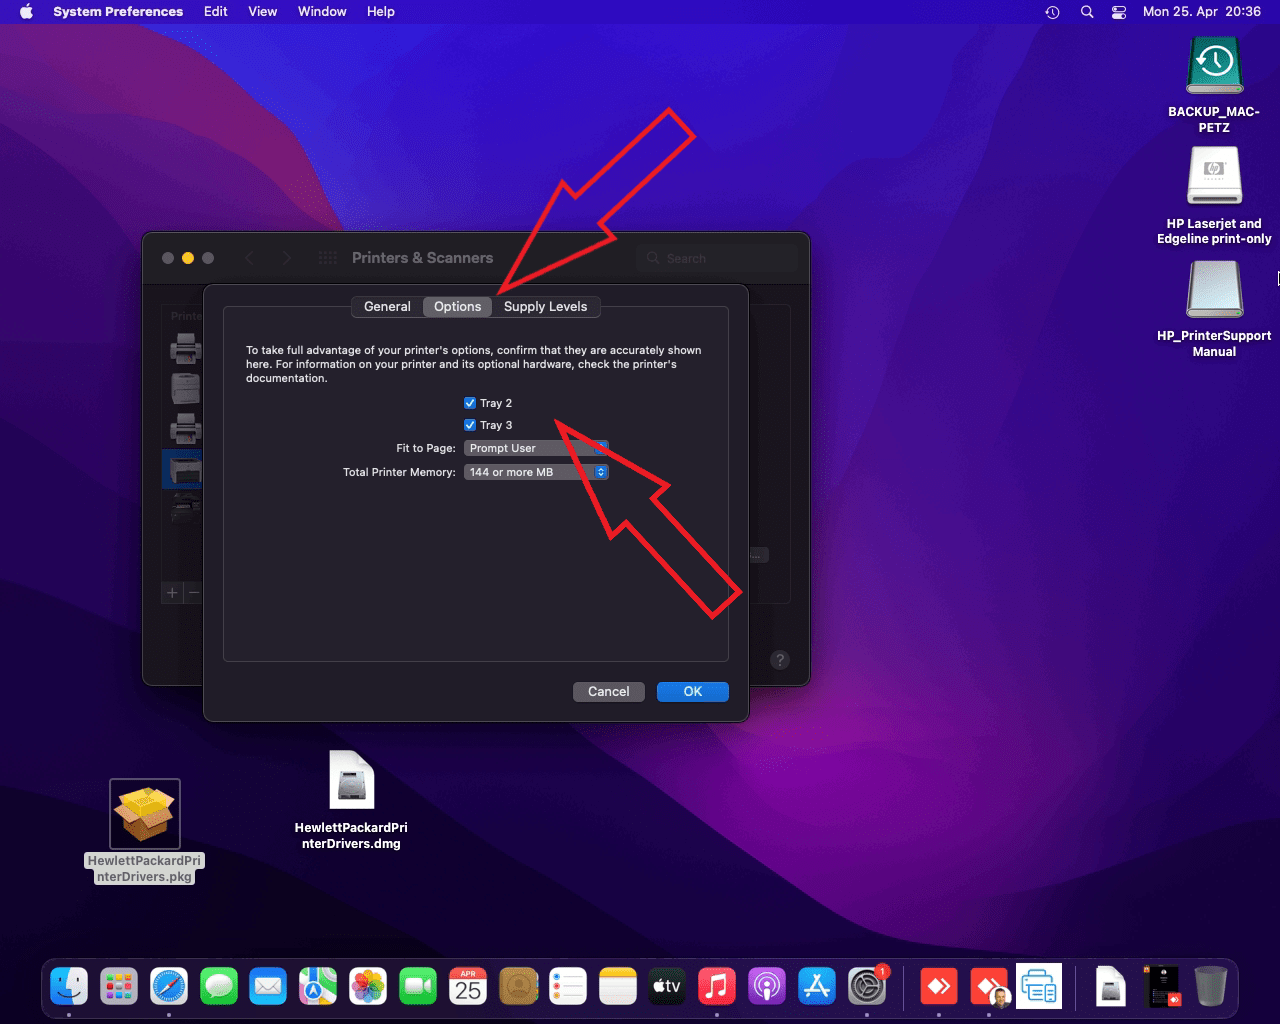
Just a short note on the mentioned older HP printers: After a bit of digging, I found a driver pack for macOS versioned 5.1.1 and last updated end of 2020, which contains drivers for all older HP printers like my LaserJet 1320 and Color LaserJet 5550. I was able to install the printers with those drivers and they just work. Compared with options for the printers available within the Windows drivers, they are very basic – but they seem to work properly. Some times, it just pays off years later to buy equipment from a premium manufacturer for a higher price – build quality and useful product lifetime may be worth the premium. You can find the download here: https://support.apple.com/kb/DL1888?locale=en_US&msclkid=ffb2a893c4c311eca8889c0f664564e2
For my old HP DesignJet 800 (no PostScript), macOS offered my the generic PostScript driver, but that didn’t seem to work very well. So I selected the HP DesignJet 500 non-PostScript driver and use that – first test plots looked great. Same story like before, again very basic drivers with near to no features when compared with the Windows versions. I still have to check the color profiles, as there are three color printers I like them all to show the same colors on printouts like I can see them on the factory-calibrated screens from HP‘s EliteDisplay series I am mainly using.
Now that we can print from macOS and other macOS installations across the network, you will definitely want to be able to print directly from iOS to these non-Airprint-capable printers very soon. To get around manually configuring the Bonjour services for each printer with all the available printer options and settings, I did a quick research and it seems there are two well-known solutions for macOS available: handyPrint from Netputing and Printopia from Decisive Tactics.
After quickly digging through their available features and the latest application update logs, I decided for myself to move on with Printopia. Although handyPrint requires only a 5$ donation to get a license, it is not able to run as service already at the login screen. To get that feature, the handyPrint pro is required with a donation of at least 20$ – and for a server from my point of view that feature is absolutely needed. handyPrint pro does not seem to have any limit on the amount of printers that one can create, but the last update was in August 2018 – two years before Apple Silicon was announced and nearly four years passed since the last update.
Printopia on the other hand costs also 20$, allows for running as a service at logon, too, but offers more advanced print and scaling options (especially with Letter to A4 conversion, printing A4 onto A3 or even large format plots I expect issues without that). Being able to configure iOS-originating prints with different settings will also allow me to restrict my kids from printing every non-sense colored. On the downside Printopia limits me to five printers, but that should be fine for most people including me. The last update of Printopia was October 2021, it runs natively on Apple Silicon already and there are Pro versions available with a nice list of business features – so I expect that tool to accompany me and my well-aged HP printers for quite some years. By the way, print to pdf and placing the resulting document into any local folder on the server seems to be a printer option on both tools as well. These folders may also be inside the iCloud, OneDrive or DropBox folders – but that might require a workaround to have the online storage sync tools running without the need to logon first. Needless to say that in Printopia that is counted as a printer as well. Read, compare, think and make your own choice depending on your needs – and you might research on additional options available.
Getting Printopia to do its job of publishing the already set up printers as AirPrint devices is straight-forward. Download, install, configure, test and if everything works finish up by buying, paying and registering that litte gem.
Content Caching
A quite strange name if you are not used to IT terms. So, here is what it does: This functionality will temporarily store software updates, apps and other content (iCloud Drive and Photos as well as iTunes Music and Videos, maybe also downloads for Apple TV+) on the harddisk of the Mac. From there it will be send to each client on the same network, which is in need for exactly the same content. That way, content is delivered on the high-speed local network instead of being re-downloaded for each client separately. That’s a life saver for those living in low internet bandwidth areas – but it must be enabled first. See https://support.apple.com/guide/mac-help/mchl9388ba1b/mac and https://support.apple.com/guide/deployment/depde72e125f/web
So, enough description, let’s get this Content Cache set up:
Open System Preferences and select Sharing. That’s your chance to change the computername on the second location – just put in the same name here like used on the WINS panel. Use the list on the left to select Content Caching. I just left the default Cache setting to ‚cache all content‘, but you may want to limit the caching for security reasons here.
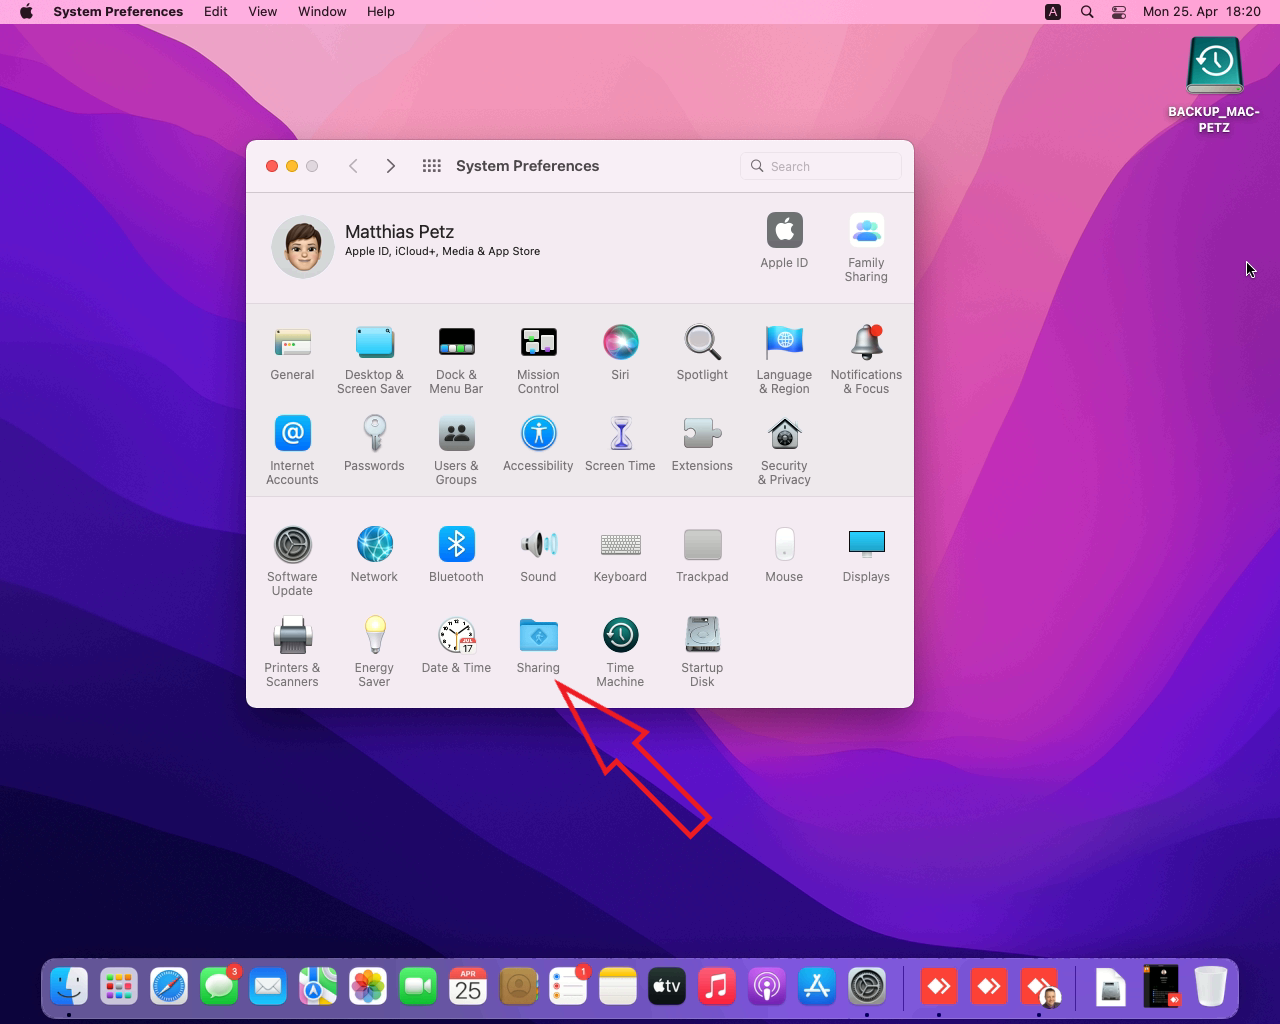
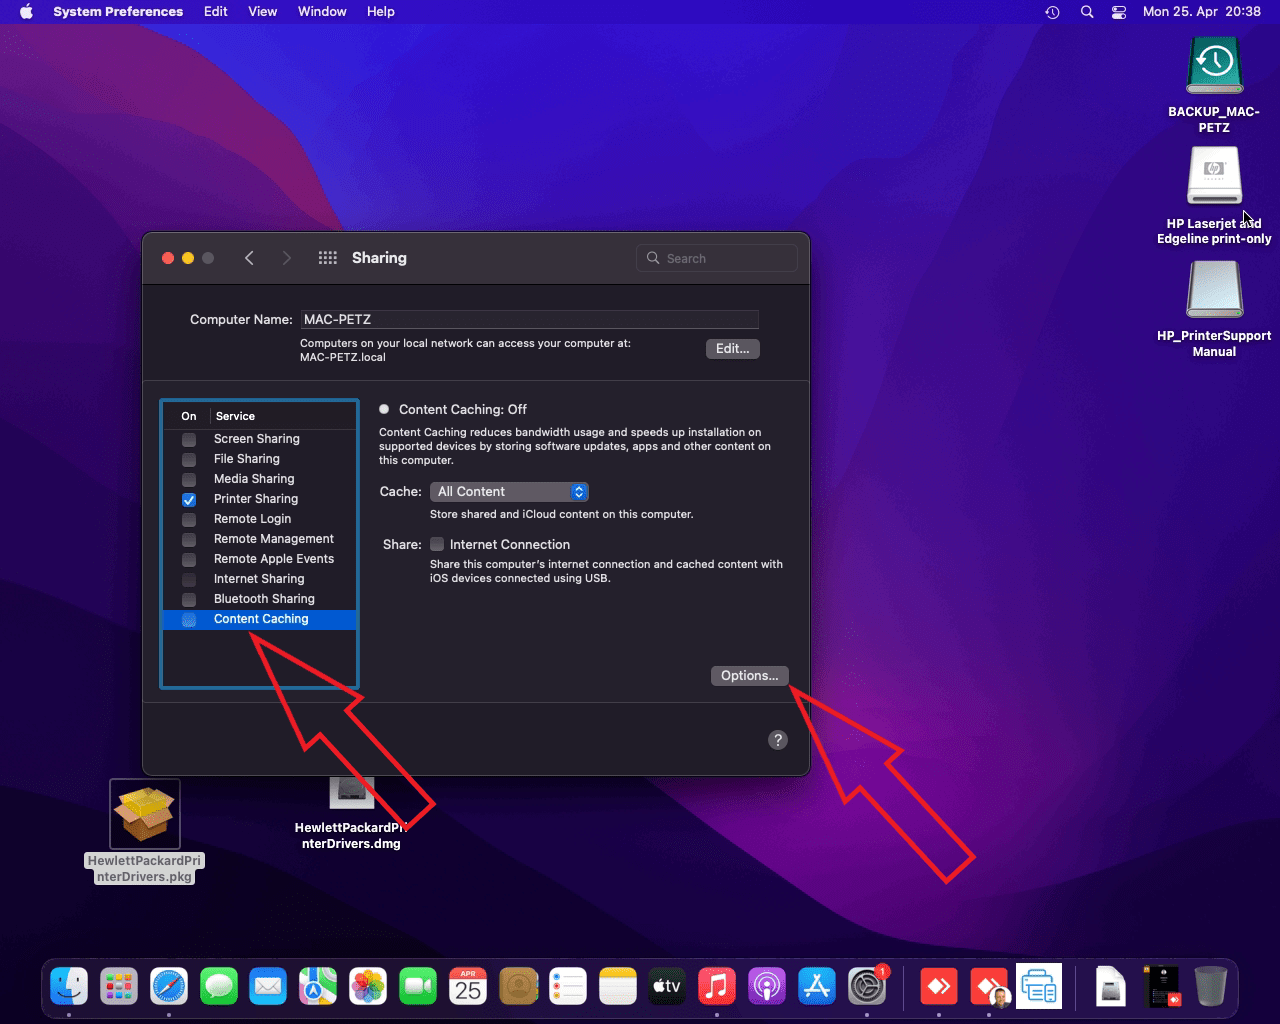
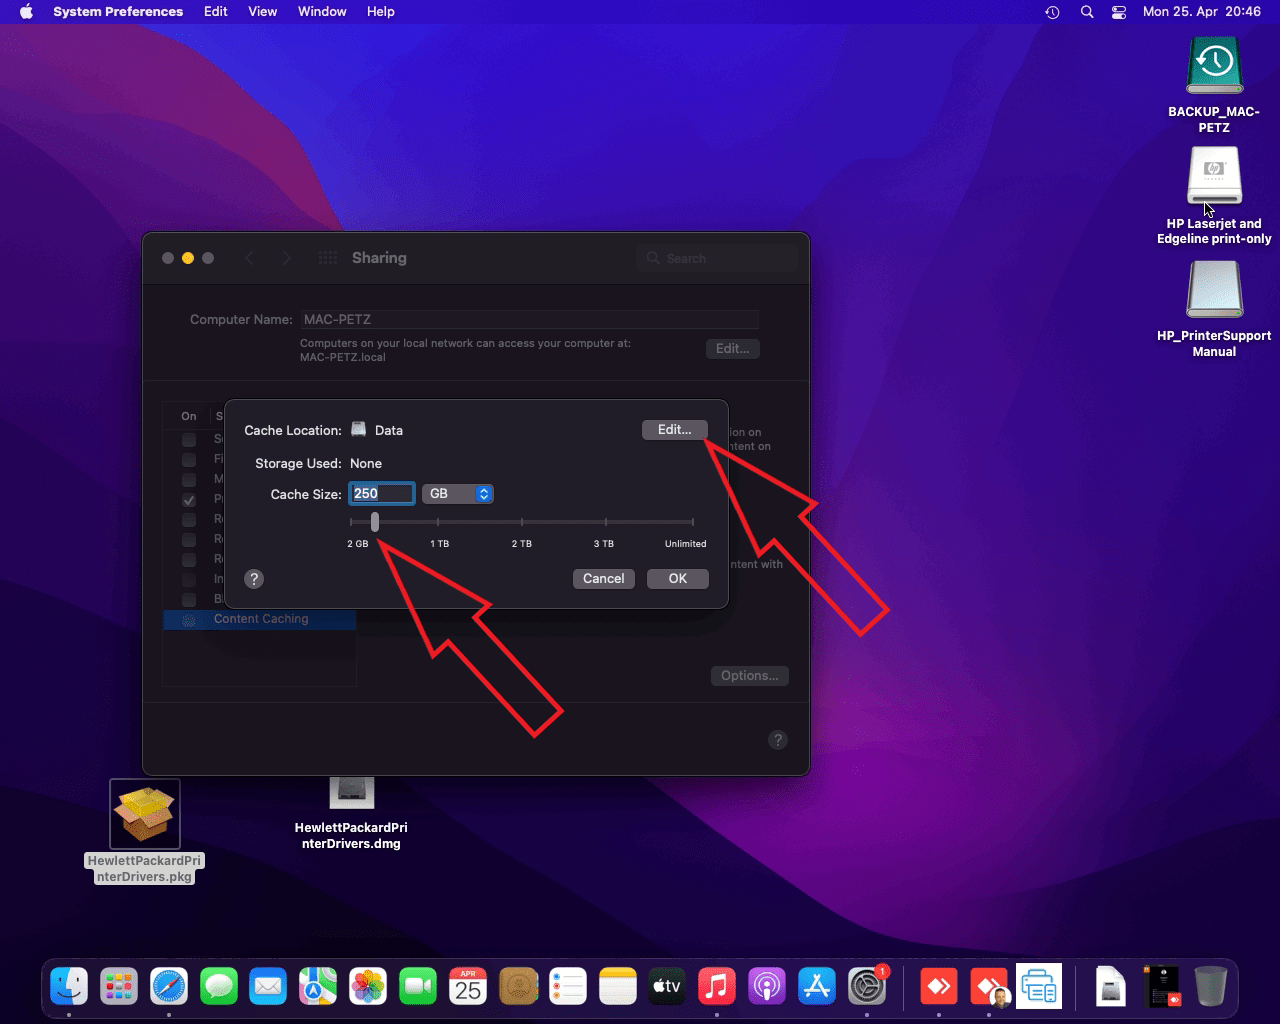
Using the Options button we will move the Content Cache storage to the larger Data volume and limit it appropriately. I did my calculation based on the following estimation: My current iCloud subscription contains 200GB of available space and about 50GB are only in use by now (do not count in backups). To that I added some space for OS upgrades/updates for four operating systems (macOS, iOS, iPadOS, AppleTV OS) and some space for Music/Video downloads as well as a large part of the same apps and games being used and played. I am startingwith 250GB and may check usage here from time to time. As soon as the settings are applied, the Content Cache data will be moved (well, as it has not been used yet, most probably only the empty database and folder structure has to be moved). To finally enable the Content Cache, you still need to click the checkbox next to it in the list on the left side and either reboot your client devices or wait until they pick up the Content Cache being available in the network over time.
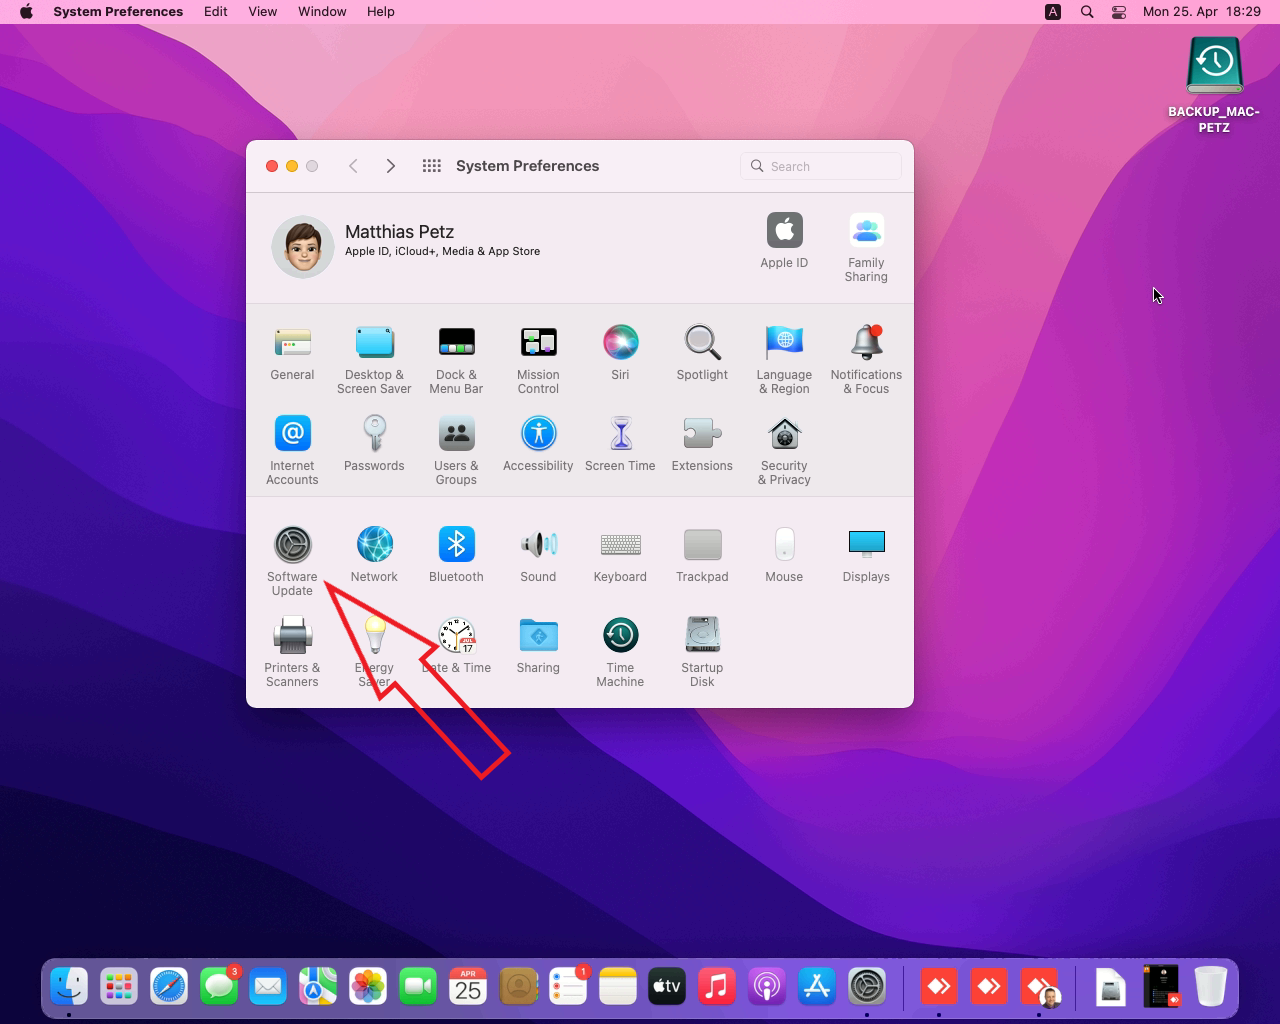
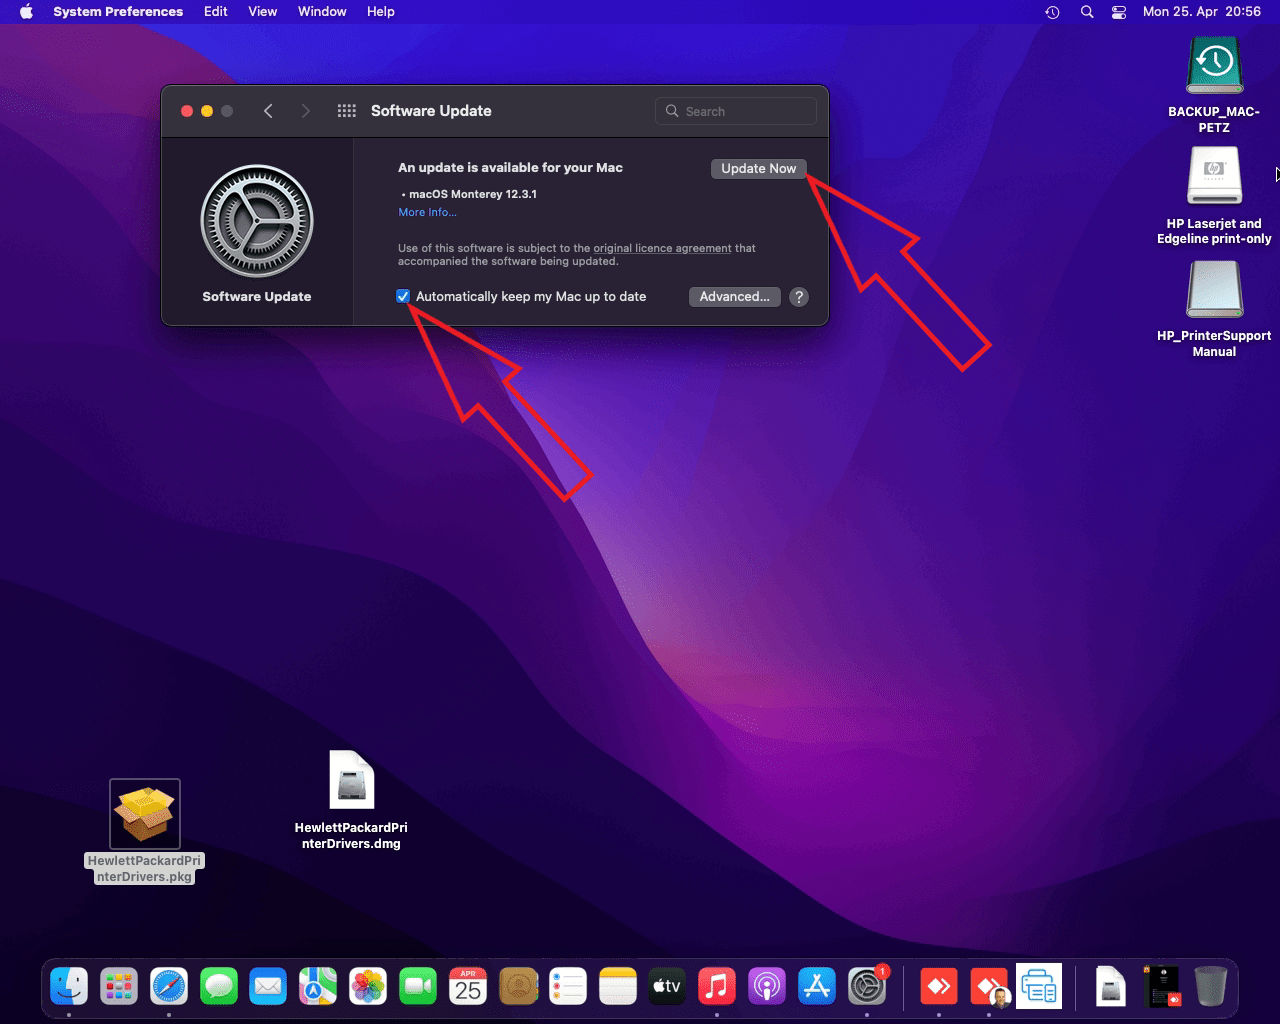
Now that the Content Cache has been set up, we can move on to Software Update inside System Preferences and enable the checkbox ‘Automatically keep my Mac up to date’, which will automatically enable all auto-update options within Advanced. According to https://support.apple.com/guide/mac-help/mchlpx1065/mac, there is no fixed maintenance window used, so I am not 100% sure that this might be the best idea by now. Click once on Update Now to bring everything up to date. This content should now start to fill the cache and You are allowed to check the cache size to verify that this is basically working. The macOS Monterey 12.3.1 update was 4.41GB in size for my MacMini and it took about 15 minutes to download – that should explain the usefulness of Content Caching.
Just a note: I had an issue after the first update with AnyDesk installed and was not able to remotely access the Mac after that has been triggered to install. I went down to the basement and switched off the hardware by pressing the power button and holding it down until the Mac switched off. A single restart later, I initiated the AnyDesk connection and logged in, then the connection was cancelled and I had to reinitiate it – afterwards everything was back to normal. Not sure what was the reason for this behaviour, but I might have to take a look in to Apple‘s own options for Remote Desktop within their ecosystem later on.
Additional settings
…that could make sense for using macOS as server
Here’s a list of things I have set in-between writing those lines while checking out the other submenus available inside System Preferences. All those settings are items, I do not want to have enabled on a server.:
System Preferences – Notifications & Focus
- Notifications tab – you’ll want to disable all notifications on a server, never show previews and not allow for any notifications on display sleeping, screen being locked or mirroring/sharing the display
- Focus tab – Disable sharing across devices and disable share focus status on each item here (hopefully that does not sync across devices)
System Preferences – Internet Accounts
- You might want to remove all internet accounts from a server
- I will keep Photos and iCloud Drive – for having the option of syncing in all data later, which may allow me to centralize the backup
System Preferences – Sound
- Disable play user interface sound effects

